Administrator and Power User can Manage Monitoring Point. Click ManageIT > Manage MPs option for MP screen.
Manage Monitoring Point :
All Monitoring Points associated with your account are listed here.
MP active/inactive status can be checked from Connection Status column.
You can remove a MP by clicking on the () Trash symbol.
All Monitoring Points associated with your account are visible on Global Map on the location where it exists.
When you hover over a location, you can view the Name and Alerts Count for that Monitoring Points on the Global Map.
Based on the Alert Count the colour visibility of Marker Points are changed for that Monitoring Points on a Global Map. Where green marker show alert count is normal, yellow when alerts count is increased, And red when alert count is high.
To create a new Monitoring Point, click on the Add Monitoring Point button.
Create a MP :
A Monitoring Point references the device location/time zone where your application will be monitored from.
After a successful subscription, the Admin should first create a MP.
Select type Auto Create Cloud MP>MP type, to create Cloud MP. Enter MP Name. Select Time Zone where you want to monitor the application. It will take 3-4 minutes to get MP created.
We will email you at the email address used to register for your ScoutITAi account once the MP is successfully created or if it fails.
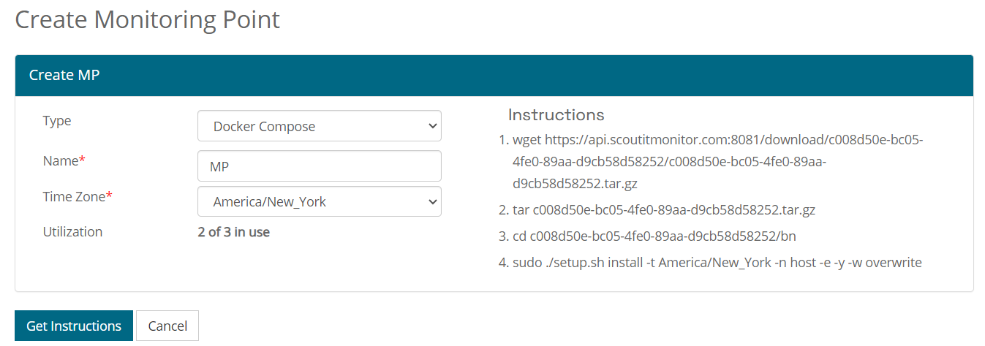
Select Download Docker Compose File MP type to download MP.
Enter MP Name. Select the desired Time Zone where you want to monitor the application and click Get Instruction.
You will see a list of instructions to download and install MP.
Follow the instruction to install the MP on your server.
Simplified Analytics
Fast Setup
Instant Savings
24x7 Support
Newsletter
Stay informed with our latest insights and updates plus industry trends—subscribe to our newsletter today!